
CSS에서 요소를 겹칠 때 어떤 요소가 위로 올라올지를 결정하는 것이 z-index입니다. 하지만 실제 레이아웃에서는 단순히 z-index 숫자만 비교하는 게 아니라 stacking context라는 보이지 않는 독립 그룹 구조까지 함께 이해해야 정확한 결과를 만들 수 있습니다.
이 글에서는 z-index 기본 개념과, 실전에서 반드시 알아야 할 stacking context까지 한 번에 정리해보겠습니다.
📌 position이 아직 헷갈린다면 z-index와 stacking context을 배우기 전에 이 글부터 보고 오는 걸 추천할게요! 😊
[🎨CSS] CSS position 속성 총정리
display 속성으로 레이아웃을 구성하는 방법을 익힌 뒤는 요소를 세밀하게 배치하고 조정할 수 있는 position 속성을 제대로 이해해야 합니다. 이 글에서는 position 속성의 기본 개념부터 static, relative
sim-plism.tistory.com
1️⃣ z-index
z-index는 요소가 겹칠 때, 어떤 요소를 더 위로 표시할지를 결정하는 CSS 속성입니다. 숫자가 클 수록 화면에서 더 위에 보이며 기본적으로 position이 relative, absolute, fixed, sticky 중 하나인 요소에 적용됩니다. position이 없으면 z-index를 주어도 적용되지 않습니다.
2️⃣ stacking context
stacking context는 요소들이 z-index를 기준으로 겹침 순서를 계산하는 독립된 그룹입니다. 하나의 stacking context 안에서는 z-index 숫자로 요소들의 순서를 비교하지만, 서로 다른 stacking context끼리는 그룹 자체의 순서를 먼저 비교합니다. position과 z-index, opacity, transform 같은 속성에 의해 생성됩니다.
💡 stacking context가 생성되는 조건 예시
- position: relative, absolute, fixed, sticky 이면서 z-index 값이 있을 때
- opacity: 1 미만일 때
- transform, filter, perspective 속성이 있을 때
- will-change, mix-blend-mode 사용 시
✔️ 이 중 가장 많이 만나는 건 position + z-index 조합
[ 부모 stacking context ]
 ├── z-index: 1 (요소 A)
 ├── z-index: 2 (요소 B)
 │    └── [ 새로운 stacking context 시작 ]
 │        ├── z-index: 5 (자식 요소 B1)
 │        └── z-index: 10 (자식 요소 B2)
 └── z-index: 3 (요소 C)
(※ B2가 z-index 10이어도 부모 B의 그룹 안에서만 비교. 부모끼리 순서가 먼저고 그 다음 자식끼리 순서를 따짐)
3️⃣ z-index + stacking context 실전 예제
<!DOCTYPE html>
<html lang="ko">
<head>
  <meta charset="UTF-8">
  <title>z-index & stacking context 예제</title>
  <style>
    .outer {
      position: relative;
      z-index: 1;
      background-color: lightgray;
      padding: 30px;
      width: 300px;
      height: 300px;
    }

    .inner1 {
      position: relative;
      z-index: 2;
      background-color: lightblue;
      width: 150px;
      height: 150px;
    }

    .inner2 {
      position: relative;
      z-index: 3;
      background-color: lightcoral;
      width: 150px;
      height: 150px;
      margin-top: -100px;
      margin-left: 50px;
    }

    .another {
      position: relative;
      z-index: 5;
      background-color: lightgreen;
      width: 200px;
      height: 200px;
      margin-top: -250px;
      margin-left: 200px;
    }
  </style>
</head>
<body>

<div class="outer">
  <div class="inner1">Inner 1 (z-index:2)</div>
  <div class="inner2">Inner 2 (z-index:3)</div>
</div>

<div class="another">Another Box (z-index:5)</div>

</body>
</html>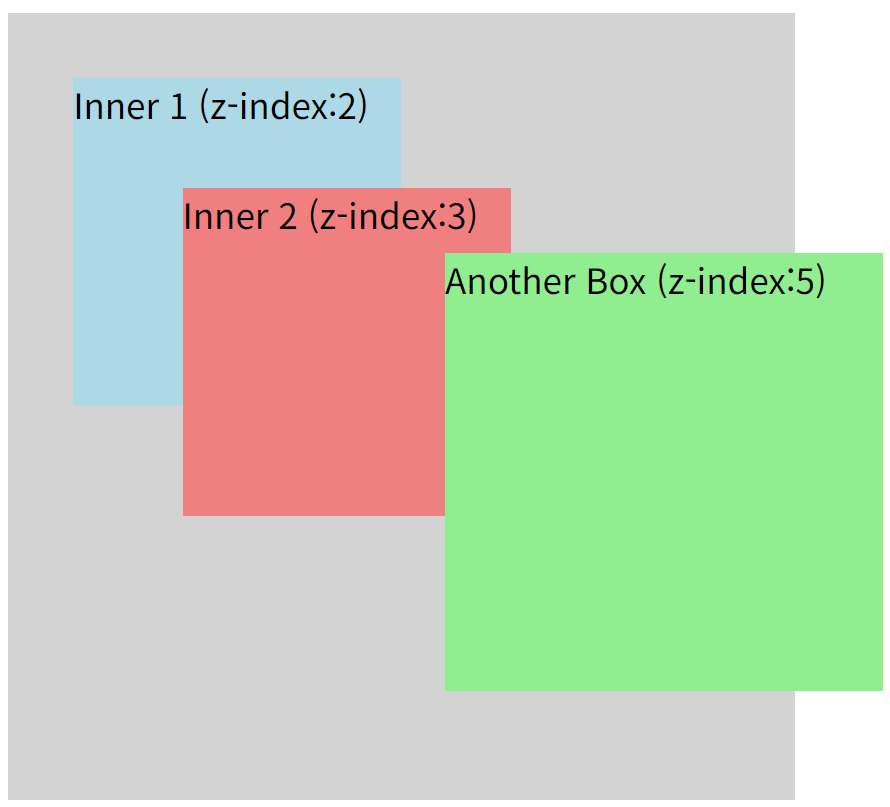
- outer 박스는 z-index 1 → 제일 아래 그룹
- outer가 position: relative; z-index:1 이니까 자체 stacking context 생성
- inner1과 inner2는 outer 안에 있는 요소들 (같은 stacking context), outer 안에서만 z-index 비교
- another 박스는 outer 바깥에 있는 요소(전체 레벨)이고 z-index가 5 → 제일 위에 뜸
5️⃣ 자주 틀리는 포인트 정리
✔️ position 없는 static 요소에 z-index 줘도 소용없다. position이 기본값(static)일 때는 z-index가 아예 적용 ❌
✅ "z-index 안 먹네?" → 일단 position 있는지 확인!
✔️ stacking context가 다르면 z-index 비교가 안 된다. 서로 다른 stacking context끼리는 부모 그룹끼리 z-index를 먼저 비교
✅ "z-index 숫자 큰데 왜 밑에 있지?" → "다른 stacking context 아니야?" 바로 의심!
✔️ opacity, transform, filter 등도 stacking context를 만든다
✅ "position: relative 없는데도 stacking context가 있네?" → "opacity, transform 썼나?" 체크!
✔️ stacking context 안에서는 내부 요소끼리만 z-index 비교한다
✅ "부모끼리 먼저, 자식끼리는 나중!" 순서를 생각할 것!
CSS에서 요소의 겹침 순서를 제어할 때는 단순히 z-index 숫자만 조정하는 것으로 끝나지 않습니다. 요소가 어떤 stacking context 안에 있는지 그리고 어떤 기준으로 겹침이 계산되는지를 이해해야 의도한 대로 레이아웃을 정확하게 제어할 수 있습니다. 이번 글에서는 z-index와 stacking context 개념을 살펴보았습니다. 다음 글에서는 overflow 속성을 정리하여 콘텐츠가 영역을 넘칠 때 어떻게 처리하는지까지 확인해보겠습니다.
'🌐 Front-End' 카테고리의 다른 글
| [🎨CSS] 반응형 웹 시작하기 — viewport, 미디어쿼리, flex-wrap까지 (0) | 2025.04.06 |
|---|---|
| [🎨CSS] CSS overflow 속성 총정리 (0) | 2025.04.06 |
| [🎨CSS] CSS position 속성 총정리 (0) | 2025.04.06 |
| [🎨CSS] CSS display 속성 총정리 (0) | 2025.04.06 |
| [⚛️React] Rc-Tree로 메신저 조직도 쉽게 구현하기 (0) | 2024.10.23 |